
Getting started with APIs
Get your API credentials
InsightIQ APIs are authenticated using client ID and secret. To maintain security, APIs must be called only from your server and never from your app / frontend. To get your API credentials, register on our dashboard.
If your API credentials are compromised or require rotation, you can regenrate them at dashboard.
InsightIQ Postman Collection
Check out our Postman Collection providing pre-formatted requests for all InsightIQ API endpoints. All you have to do is set your API credentials to get started.
Integrating InsightIQ into your app
Try the sample app to see how creators use InsightIQ to share their data with apps like yours. Once familiar with the process, you can set up the same "Connect" experience on your apps using our SDKs and start fetching data.
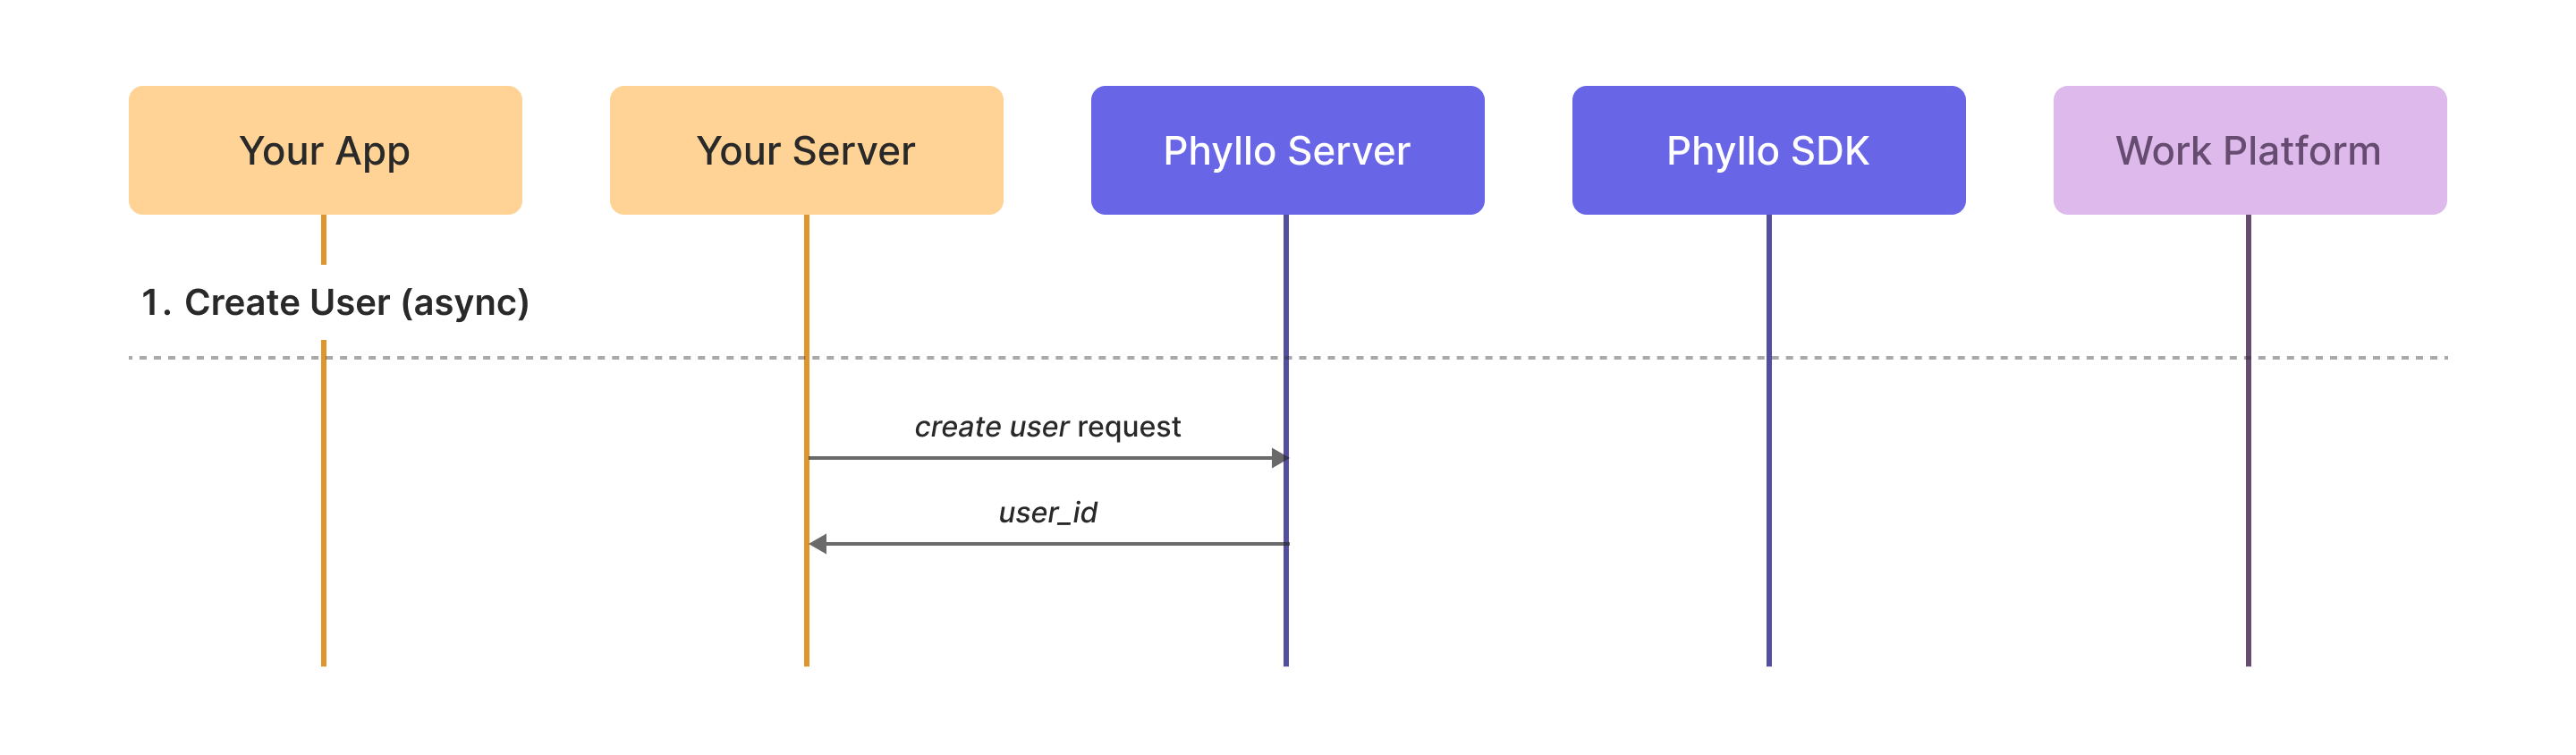
1. Create a user
Execute at: backend
Use the create a user API to create a user on InsightIQ for every creator who needs to share their data.
The id returned in the response uniquely identifies each user even when they return to your app.
POST https://api.staging.insightiq.ai/v1/users
Authorization: Basic
Content-Type: application/json

{
  "name": "John Doe",
  "external_id": "unique-user-id"
}
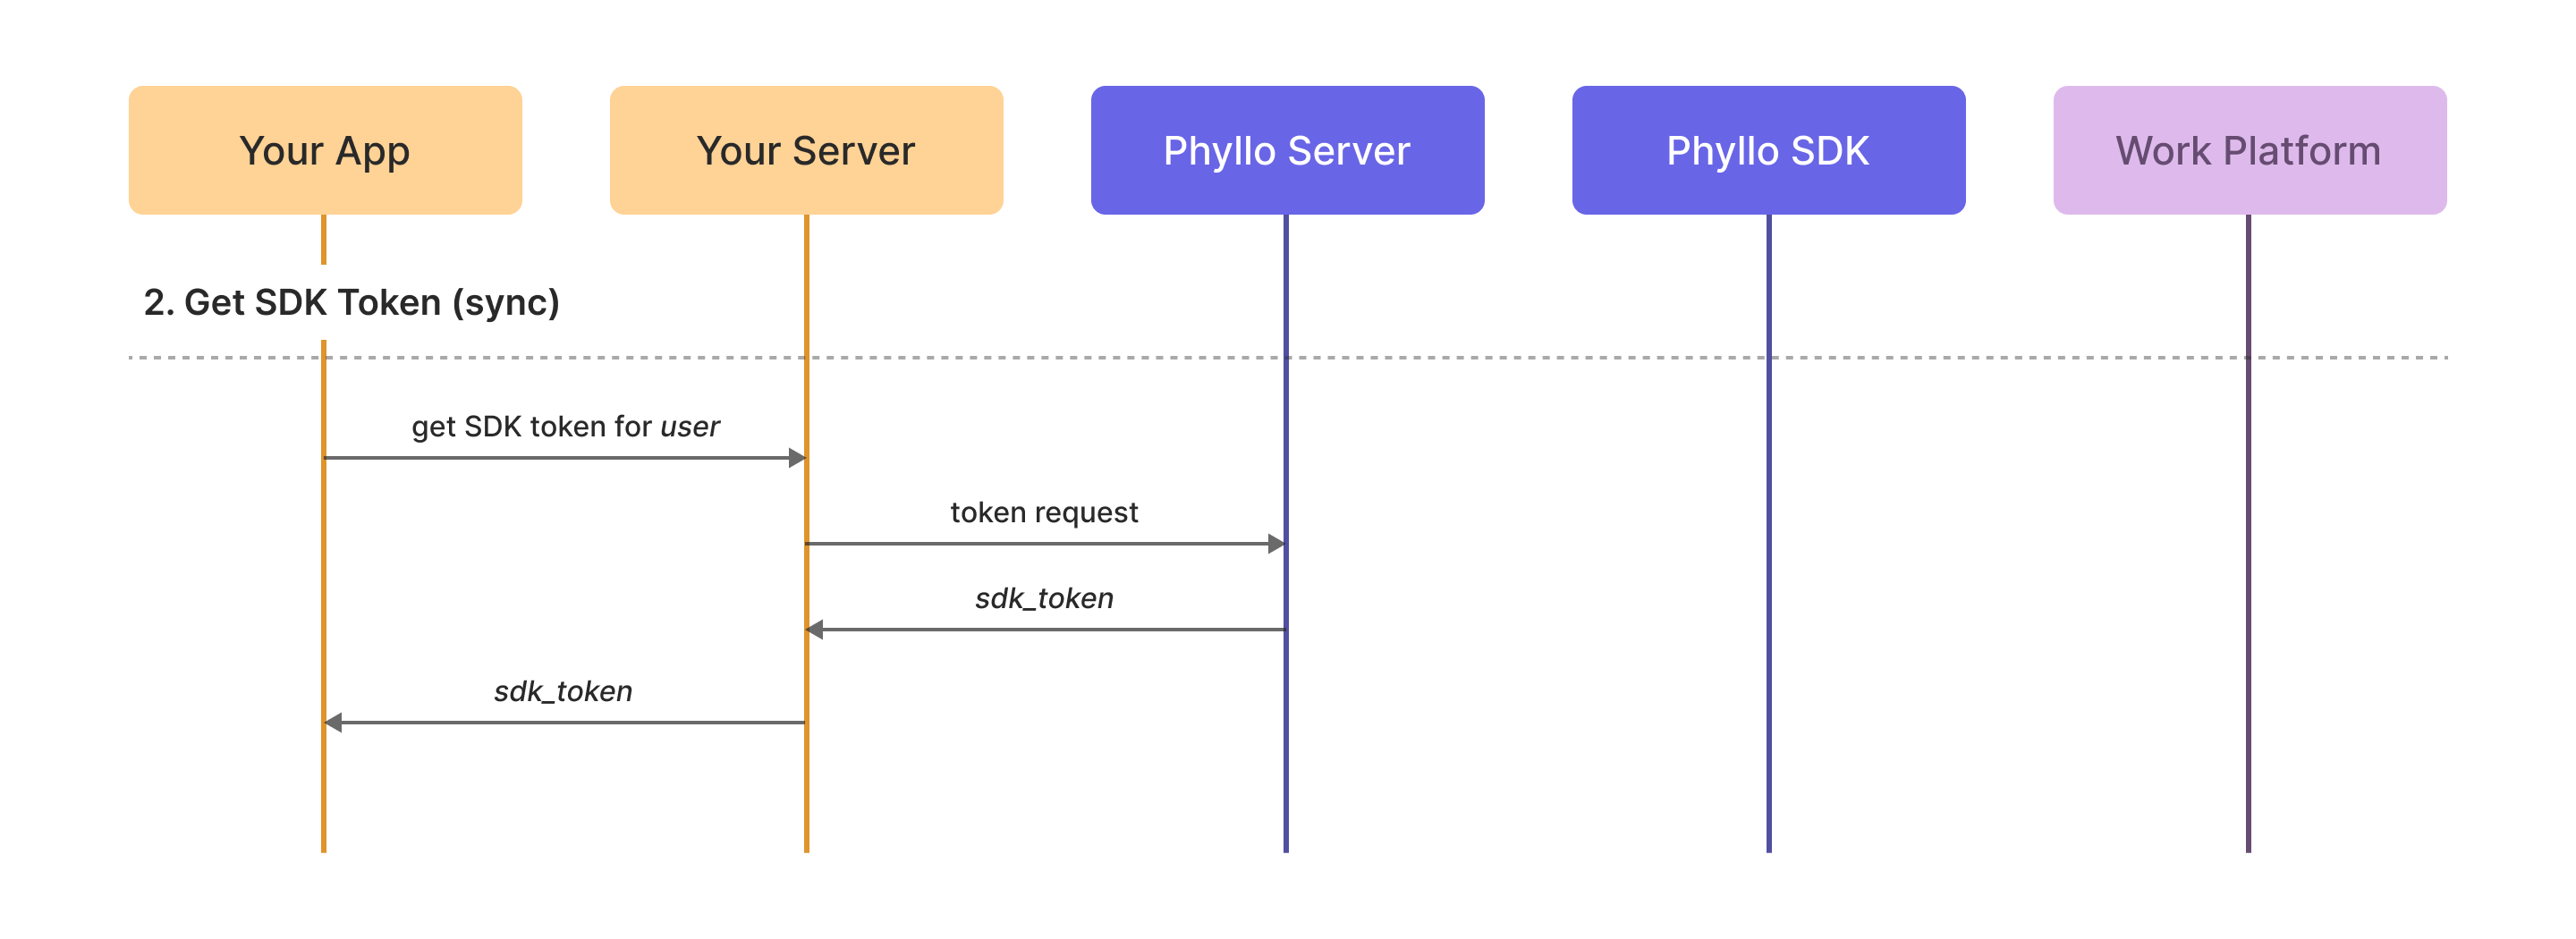
2. Create an SDK token
Execute at: backend
Generate SDK token using the id returned in Step 1. This token can now be used to initialize the SDK and start the account connection process. The token is valid for one week.
Remember to set IDENTITY, IDENTITY.AUDIENCE, ENGAGEMENT, ENGAGEMENT.AUDIENCE, ACTIVITY, INCOME or PUBLISH.CONTENT (or a combination of these) as the value for the products parameter in the API request. This is based on the data points you wish to collect about the creator and which product do they fall under.
POST https://api.staging.insightiq.ai/v1/sdk-token
Authorization: Basic
Content-Type: application/json

{
  "user_id": "John Doe",
  "products": [
    "IDENTITY",
    "IDENTITY.AUDIENCE",
    "ENGAGEMENT",
    "ENGAGEMENT.AUDIENCE",
    "INCOME"
  ]
}
3. Connect accounts
Execute at: frontend
Initialize the Connect SDK using the token from Step 2 and launch the SDK. This will open the page from where your users can log in to platforms like Instagram and start sharing their data.
Platform-specific SDKs are available for Web, iOS, Android, Flutter, and more. To launch this page, call the associated SDK function.
Read more about different SDKs we offer.
<script src="https://cdn.getphyllo.com/connect/v2/phyllo-connect.js"></script>

<script>
  const config = {
    clientDisplayName: clientDisplayName, // the name of your app that you want the creators to see while granting access
    environment: environment, // the mode in which you want to use the SDK, `staging` or `production`
    userId: userId, // the unique user_id parameter returned by InsightIQ API when you create a user (see https://docs.insightiq.ai/docs/api-reference/reference/openapi.v1.yml/paths/~1v1~1users/post)
    token: token,
  };

  const phylloConnect = PhylloConnect.initialize(config);

  phylloConnect.on("accountConnected", (accountId, workplatformId, userId) => {
    // gives the successfully connected account ID and work platform ID for the given user ID
    console.log(
      `onAccountConnected: ${accountId}, ${workplatformId}, ${userId}`
    );
  });
  phylloConnect.on(
    "accountDisconnected",
    (accountId, workplatformId, userId) => {
      // gives the successfully disconnected account ID and work platform ID for the given user ID
      console.log(
        `onAccountDisconnected: ${accountId}, ${workplatformId}, ${userId}`
      );
    }
  );
  phylloConnect.on("tokenExpired", (userId) => {
    // gives the user ID for which the token has expired
    console.log(`onTokenExpired: ${userId}`); // the SDK closes automatically in case the token has expired, and you need to handle this by showing an appropriate UI and messaging to the users
  });
  phylloConnect.on("exit", (reason, userId) => {
    // indicates that the user with given user ID has closed the SDK and gives an appropriate reason for it
    console.log(`onExit: ${reason}, ${userId}`);
  });
  phylloConnect.on("connectionFailure", (reason, workplatformId, userId) => {
    // optional, indicates that the user with given user ID has attempted connecting to the work platform but resulted in a failure and gives an appropriate reason for it
    console.log(`onConnectionFailure: ${reason}, ${workplatformId}, ${userId}`);
  });

  your_button.onclick = phylloConnect.open();
</script>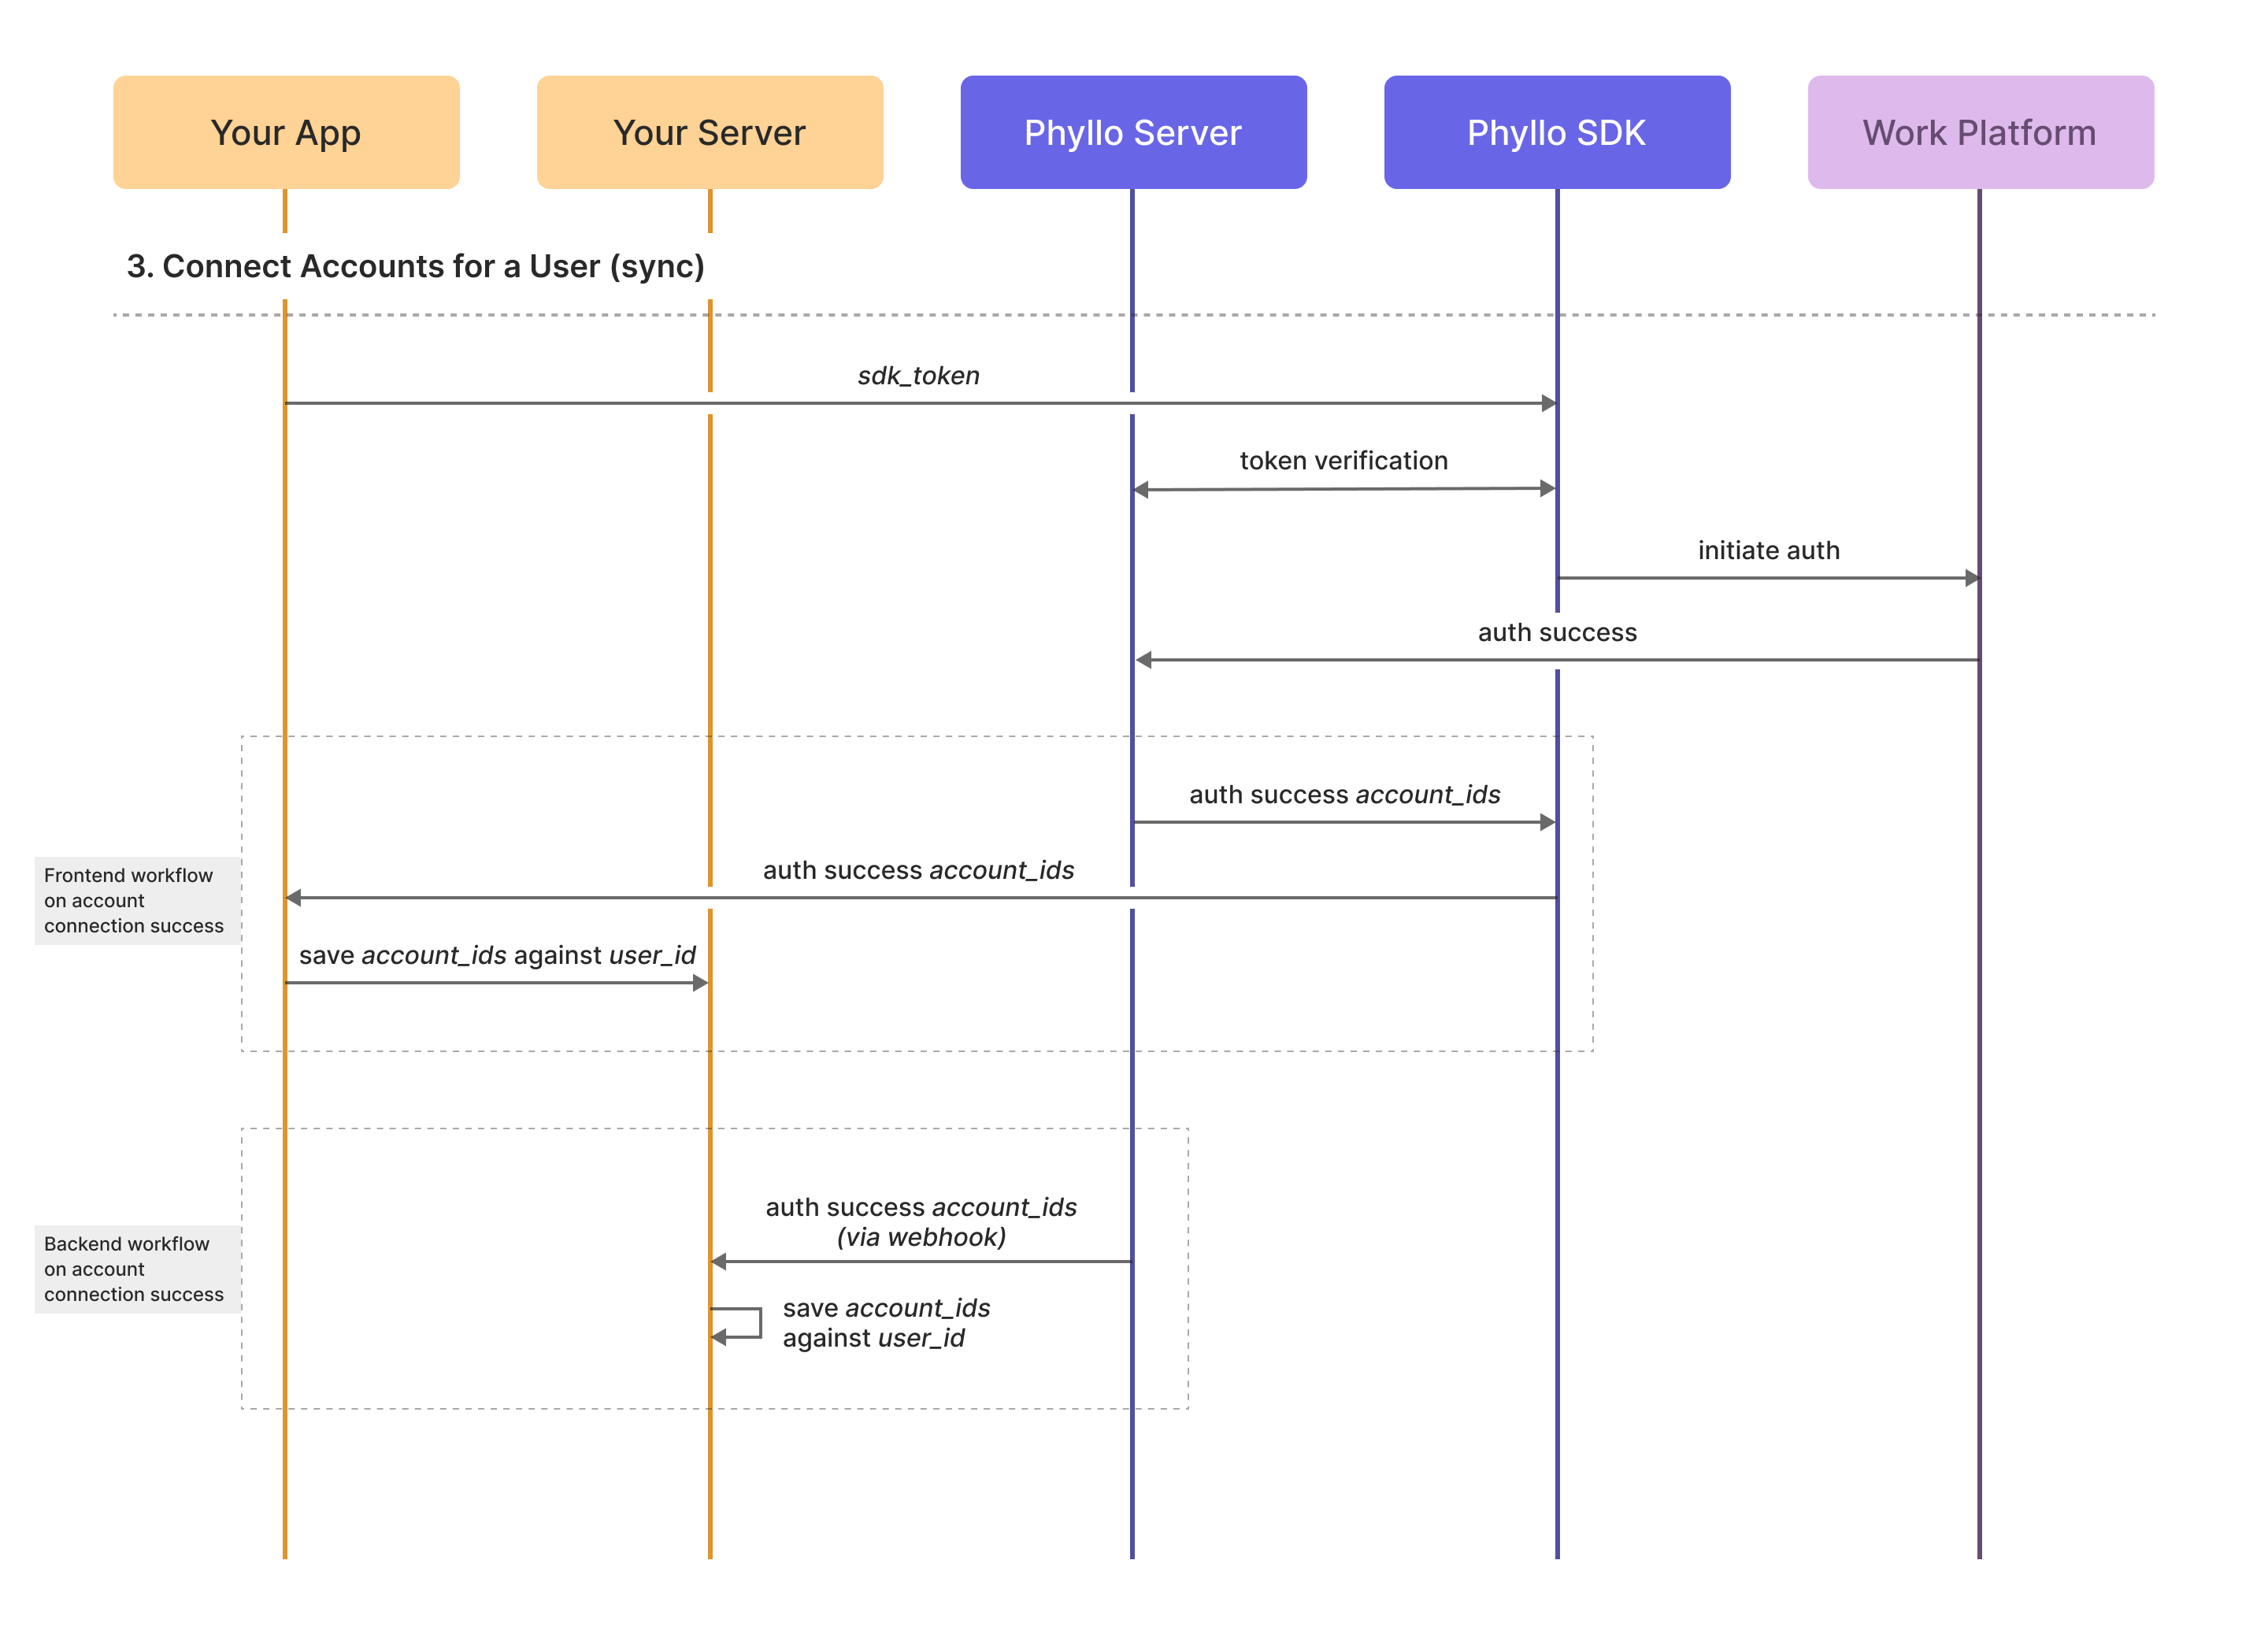
4. Fetch data from connected accounts
Execute at: backend
There are three ways of getting notified about a new account connection:
Front-end events: All our SDKs support instantaneous events to tell you when a new connection happens. You can use these events to build a good app experience for your users and use the data from these events (
account_id, etc.) to start making relevant API calls via your backend.Webhooks on Backend events (described in next step): This is a more reliable method but not as instantaneous as a front-end event. You can use the data from these events (
account_id, etc.) to start making relevant API calls.API Polling: This is not a recommended method for integration and cause issues such as running into rate-limiting related errors.
In general, webhooks are a more reliable source of data. They are delivered directly from our server to your server, independent on the user's device or internet connection. Although, since webhooks are not as quick and real-time as the events being triggered on the frontend, relying on webhooks to update frontend is not recommended.
Recommended Workflow for an optimal integration:
Use front-end events for real-time updates and to improve user experience and use webhooks to initiate backend processes and fetch data reliably via InsightIQ.
Once the accounts are connected via InsightIQ (Step 3), you can start fetching their data from the platforms (Instagram, YouTube, etc.) with the following steps.
Call the Retrieve all accounts API to get all the accounts connected by your users. The response will also include account connection status and the data sync status for the all the rquested products (e.g.,
IDENTITY). Once synced, you will receive a webhook notification for each type of data.Upon receiving the profile related notification, fetch the profile information of an account using the Retrieve a profile API. This API returns profile-level information like username, bio, number of followers, etc., and can be used to verify account ownership and identity of your users.
Upon receiving the content related notification, you can fetch the media content of an account using the Retrieve all content items API. This API returns the content posted by creators and its associated engagement metrics, including likes, shares, impressions, and others.
GET https://api.staging.insightiq.ai/v1/profiles?account_id=
Authorization: Basic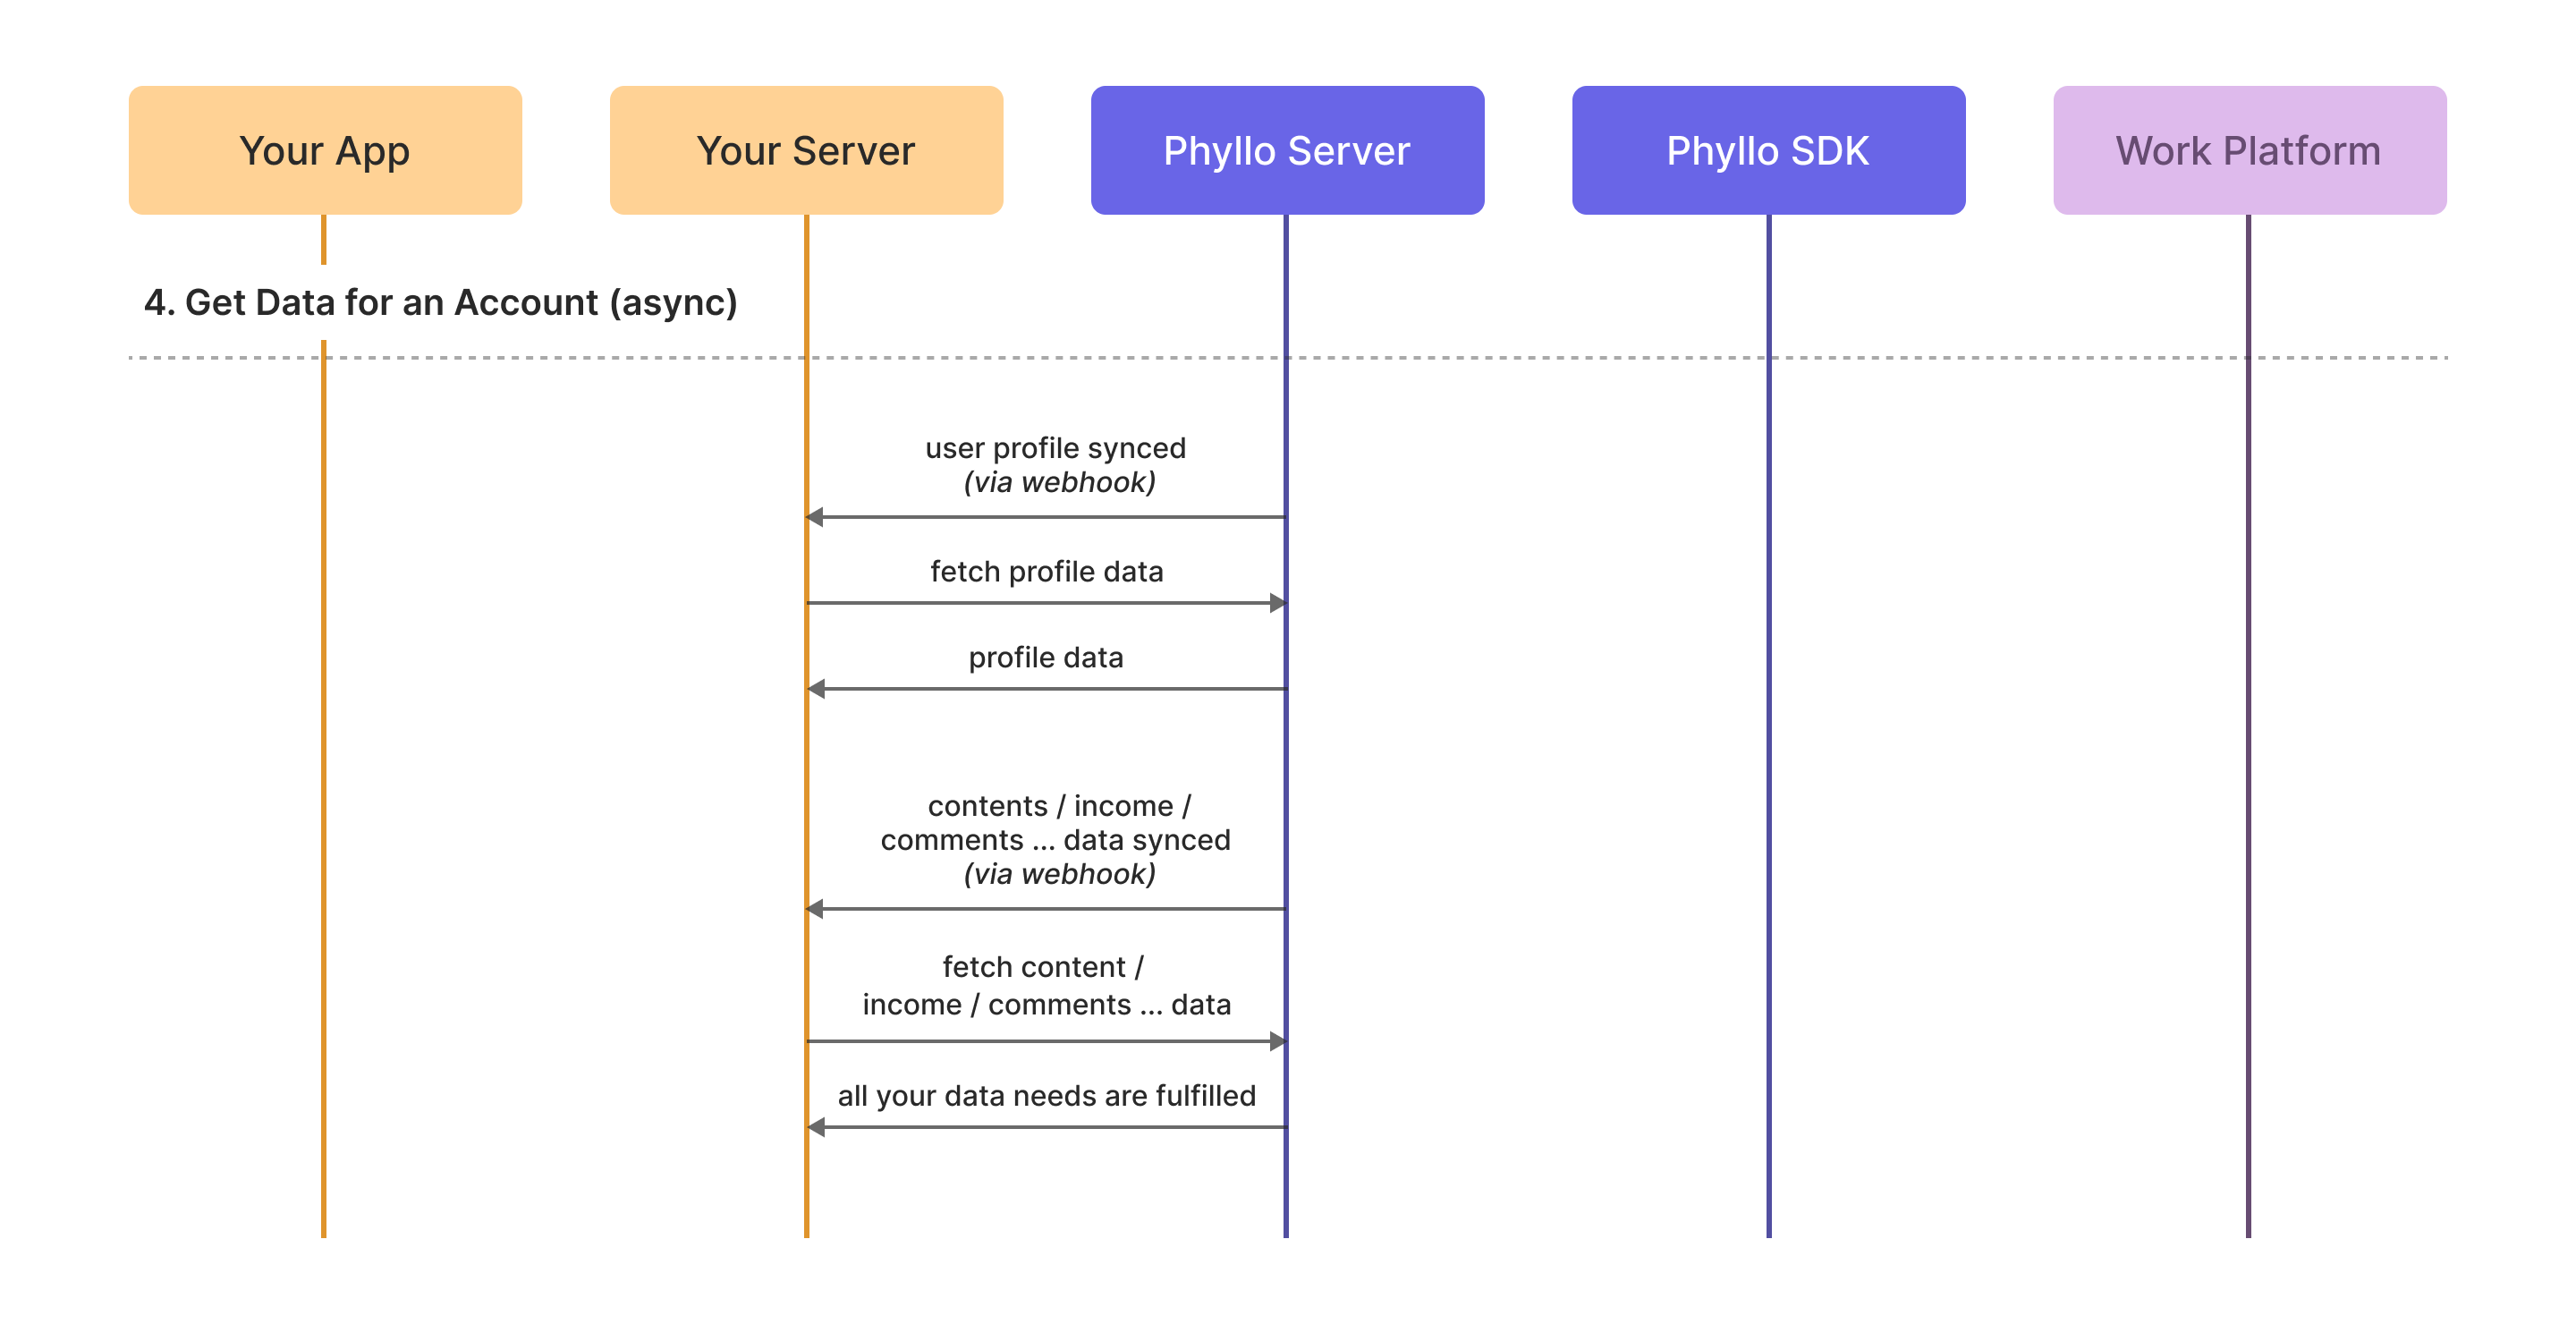
5. Setup webhooks to receive account and data updates
Execute at: dashboard or backend
Webhooks will be the primary source of updates in the account linking status and data availability. Your application must listen to incoming webhook events and process them to confirm data availability after an account is connected to the work platform.
Our Developer Dashboard is the easiest way to manage your webhooks. For an initial tests, you can use one of the popular request interceptors such as:
These interceptors will let you create a test URL and set that as your webhook URL. Read more about Our webhooks here.
POST https://api.staging.insightiq.ai/v1/webhooks
Authorization: Basic
Content-Type: application/json
{
"url": "http://0.0.0.0:8000/webhook",
"events": [
"ACCOUNTS.CONNECTED",
"PROFILES.ADDED",
"PROFILES.UPDATED"
],
"name": "test webhook"
}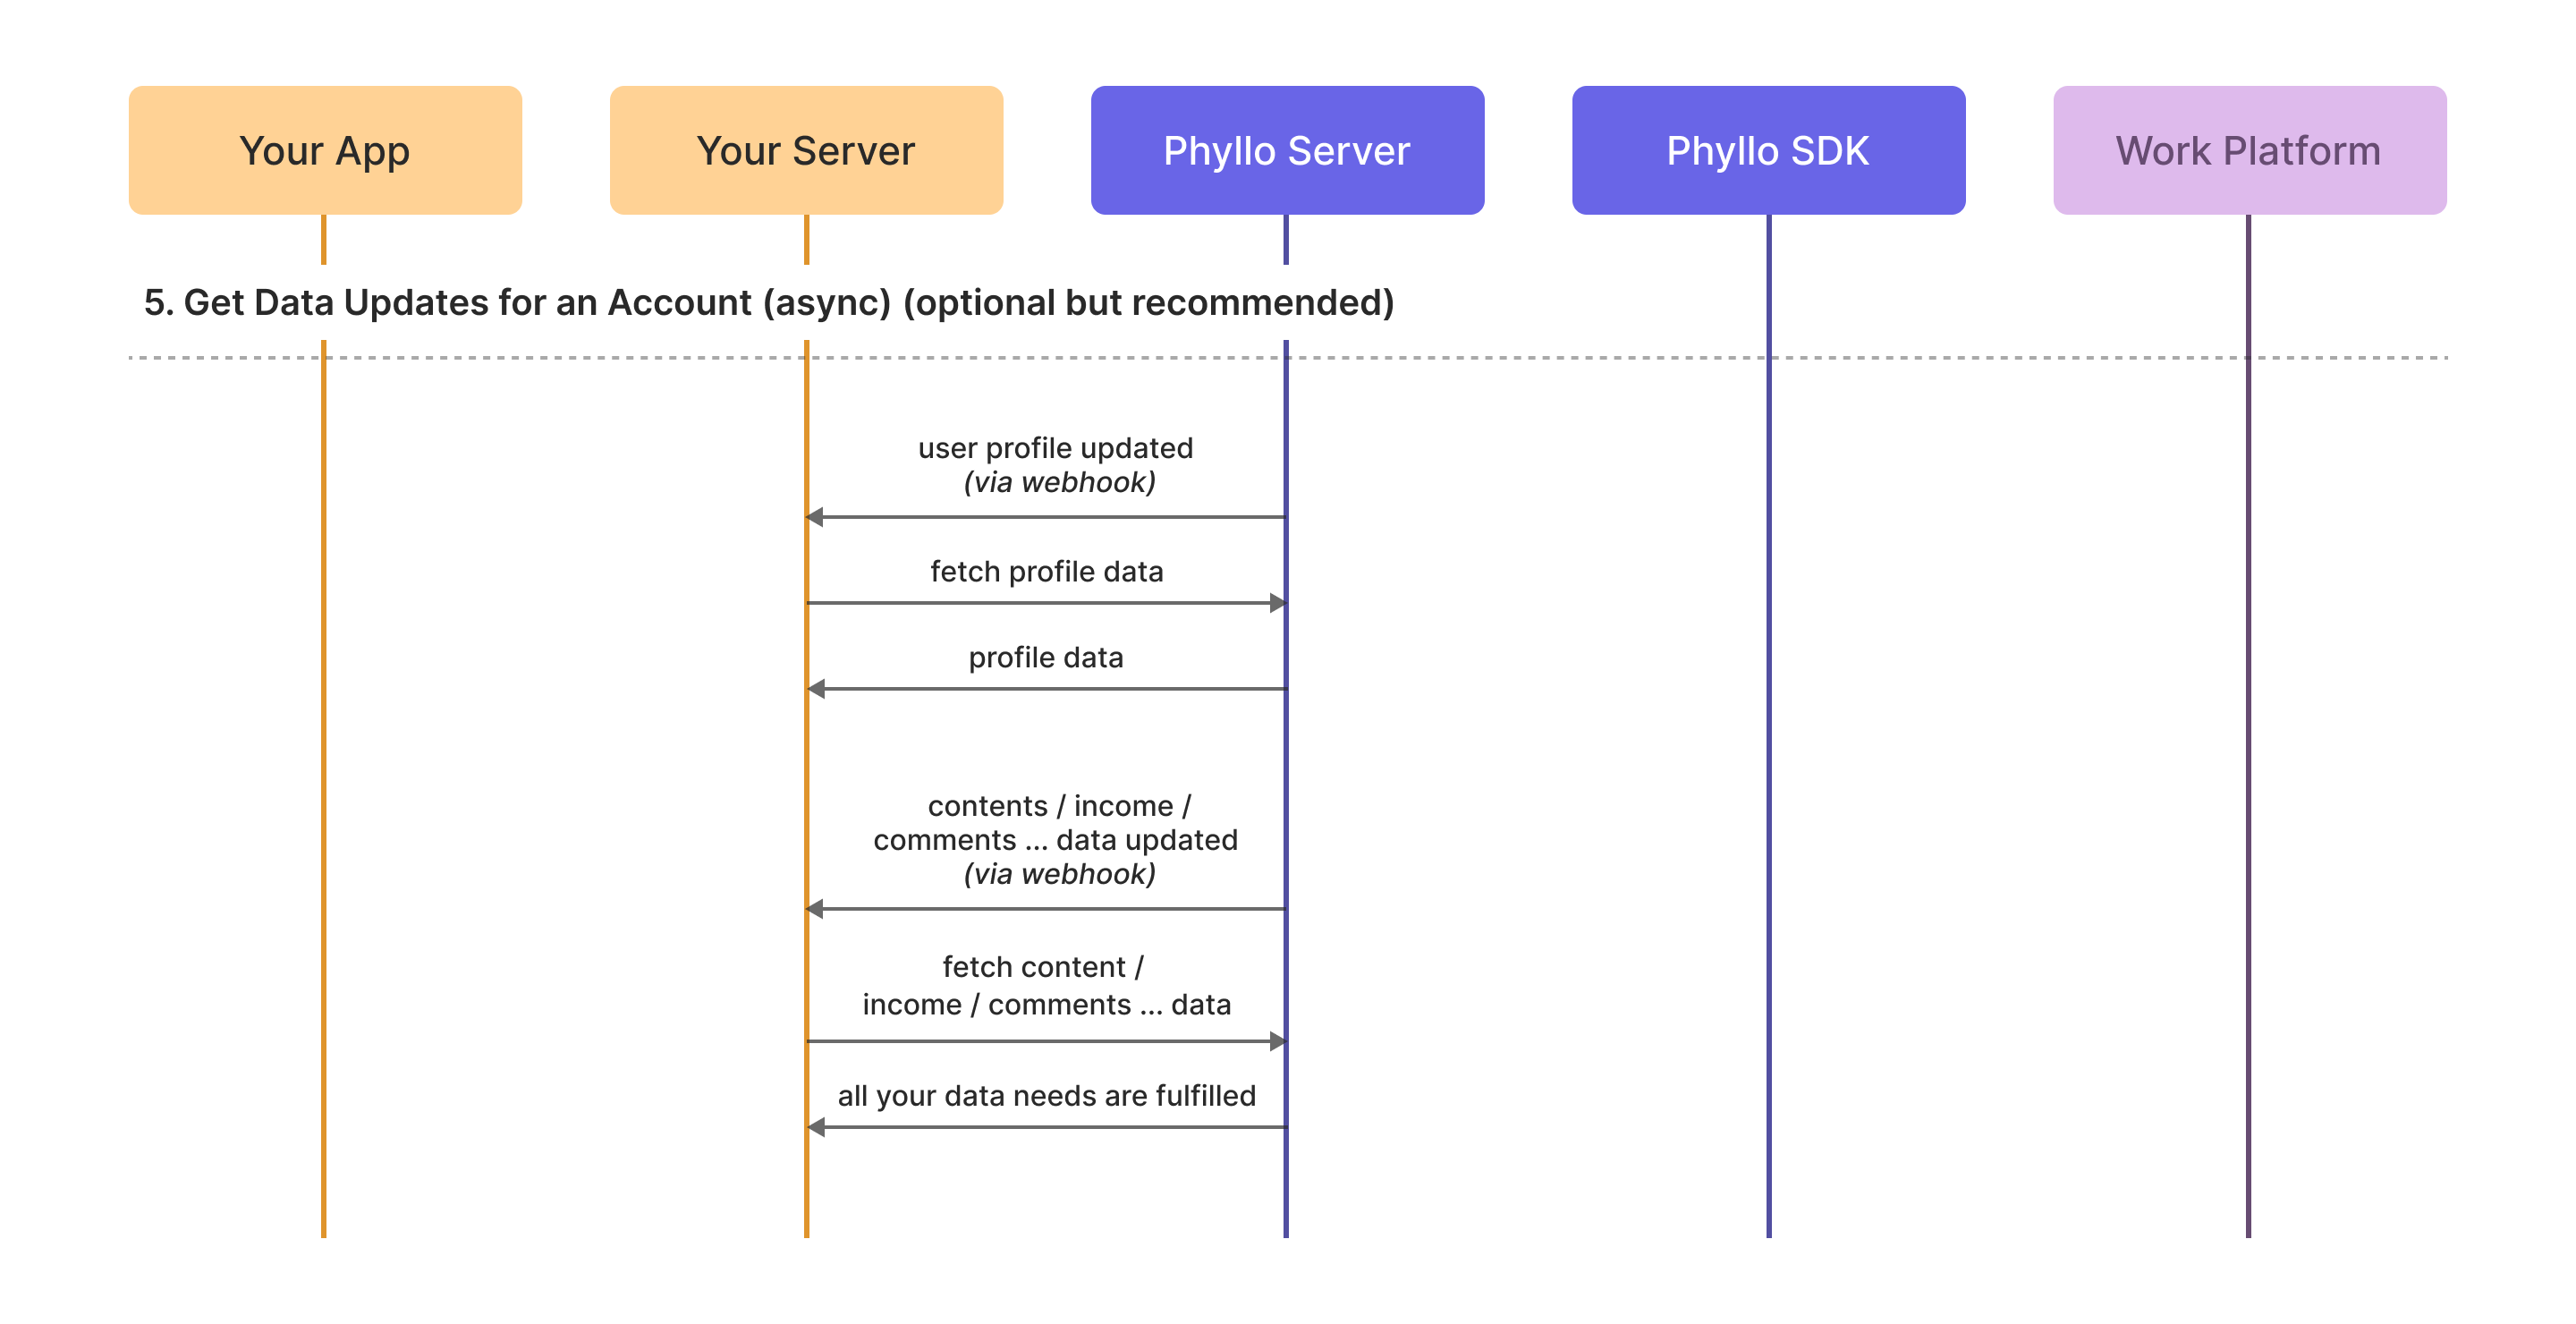
Here is a data flow diagram, depicting the entire process listed above looks like.

Using InsightIQ APIs on Staging
Integrating the InsightIQ Connect SDK on various front-end platforms is straightforward, provided you have a functional backend. While the above steps apply to staging, and production environments, we recommend decoupling front-end development from backend dependencies during the initial stages.
To facilitate this, InsightIQ provides a staging environment pre-populated with dummy data and test users. This allows you to quickly explore and build with our APIs without needing a backend setup.
Follow the below steps to start working with the Staging APIs:
1. Fetch all users
Execute at: backend
Call the Retrieve all users API. You will get a complete list of users available.
GET https://api.staging.insightiq.ai/v1/users
Authorization: Basic2. Retrieve all accounts of a user
Execute at: backend
Fetch all connected accounts for each user using the Retrieve all accounts API. Each account corresponds to a real-world account on a platforms like Instagram, YouTube, etc.
GET https://api.staging.insightiq.ai/v1/accounts?user_id=
Authorization: Basic3. Fetch profile information of an account
Execute at: backend
Fetch profile details of an account using Retrieve a profile API. Use this API to verify if your creators are who they claim they are by getting information such as username, follower count, bio, etc.
GET https://api.staging.insightiq.ai/v1/profiles?account_id=
Authorization: Basic4. Get the media content of an account
Execute at: backend
Fetch content information of an account using Retrieve all content items API. Use this API to fetch content posted by creators and associated engagement metrics, including likes, shares, impressions, etc.
GET https://api.staging.insightiq.ai/v1/social/contents?account_id=
Authorization: Basic5. Mock the frontend connection flow
Execute at: frontend
After the backend setup is complete, you can test various user flows by following the same steps outlined above. This includes configuring webhooks and connecting your account on the frontend using the staging mode with our Connect SDKs. Once the connection is successful, the webhook URL you specified will receive a notification, allowing you to retrieve user data as you would in a live environment.
In the staging mode, usernames, passwords, OTP fields, and permission pages are fully mocked. You can proceed seamlessly by entering any placeholder data, ensuring a smooth and efficient testing process without requiring a live backend.
Boilerplate sample app
If you're not ready to integrate the Connect SDK into your application just yet, we provide boilerplate sample apps with pre-installed SDK to quickly explore the full InsightIQ Connect experience and hit the APIs.
To get started, simply download any of our sample apps, configure your API credentials in the environment file, and you're good to go. These apps use the Connect SDK and APIs internally.